Kingdom A&S display

Kingdom A&S. One of my (unsurprising) favourite events of the year, and because the world is trying to end itself, we’re not there. It should be tomorrow, I should be madly packing and anxiously waiting for the workday to end so we can get on the road, and only one of those things is happening. (Work from home does not make the anticipation of the weekend any less, I’m discovering.)

However, I was going to show the world the current state of my embroidery sampler for the year, three months in. And then I realized that I haven’t even shown the blog the finished pieces for March, or February! Hard to believe that it’s 1/4 of the way done, although I need to get my skates on to pick something for April. Did you know that’s NEXT WEEK!? YIKES!

img_20200327_155314896

Appliqué, Blackwork and Canvaswork

There we are. The first three, hanging out side by each. I have not yet decided how I want to display all twelve when they are done. I suspect one big hanging of some sort, but honestly, where would I put it? It’s why they haven’t been finished off more than this, because I don’t know what to do with them.

img_20200130_071713865

Derpy deer in his final glory.

The one I’ve learned the most on was derpy deer. Appliqué is totally new to me, and it had the steepest learning curve. The next two months were techniques I’m familiar with, at least in theory, so while it was a new pattern, or a variation on a theme, it was familiar.

img_20200327_162107288

Fastest by FAR was March’s canvas work. It took me a week. I can absolutely see why it’s a great choice for covering walls with, it goes so incredibly fast. Get that first pattern line in, and then it is absolutely mindless follow the yellow brick road along. It was also the one I’ve enjoyed doing the least, probably for exactly that reason. (Although in the current mental climate of uncertainty and chaos, I’d probably welcome it, so take that for what it’s worth).

img_20200224_221229013

I love finished derpy deer, but there was language and freak out on the way through to get there. Blackwork was just.. blackwork. I surrendered on plaited braid stitch and just went with normal braid stitch, which I think was a good call at the size I was working at, but now I do have an embroidery stitch nemesis to reload the boss fight on.

Next month is couched work, and I think it’s going to be Bayeux stitch, named for the tapestry, and if you name the stitch after the tapestry, it would be silly for me not to pull my inspiration FROM the tapestry itself. Stay tuned for that!

How’re you doing?

escalator

Well. Goodness. I think all the memes about ‘well that escalated quickly’ basically sum up the world right now, with the pandemic changing the world around us by the minute it feels like. The vast majority of us are now at home full time, some with work to keep us busy, some chasing children who are bored out of their minds, some with unending amounts of free time stretching out to infinity and beyond.

There’s no one right way to handle this, by the by. Some folks are diving into big creative projects they’ve always wanted to try. Attending classes every couple of hours, driving from the firehose of online information and fresh productivity that comes from having copious free time all of a sudden. Some folks are retreating back a bit, not quite as delighted by a whole slew of MORE new things and finding solace in familiar crafts and media while everything else is in chaos of new. Both of these, and somewhere in the middle, are totally reasonable. I’m in the second camp. I am a creature of routine, and lists and expectations and suddenly things are changing ALL THE TIME. I will find my new normal and find some concentration and creativity again, but for the moment, I’m settled in on the familiar. A bit of (terrible) weaving. Some mending. My journal has come back out of hibernation as an invaluable spot to settle all those many thoughts into a non judgemental location. I’ve started a new utterly basic dishcloth shawl out of scrappy yarn, my plague shawl. Garter stitch and cozy wool. I can literally knit this in my sleep, and it provides a familiar motion for my hands while my brain is overly full. My social schedule seems to be just as full of zoom / FB live / etc etc meetings with friends to chatter and craft together. It’s not quite the same, but it’s a welcome sense of connection.

img_20200320_144647520

It’s okay if you don’t write the next great novel, or King Lear (the quip being that Shakespeare wrote it while in quarantine), or produce a pentathlon worth of perfectly researched A&S projects. (It’s awesome if you do, I wanna see the cool things!). Bake some cookies, watch a familiar movie and knit on your plague shawl. We will find equilibrium, and we will come together to hug each other close when we’re on the other side of this.

Madder abuse, pt 2.

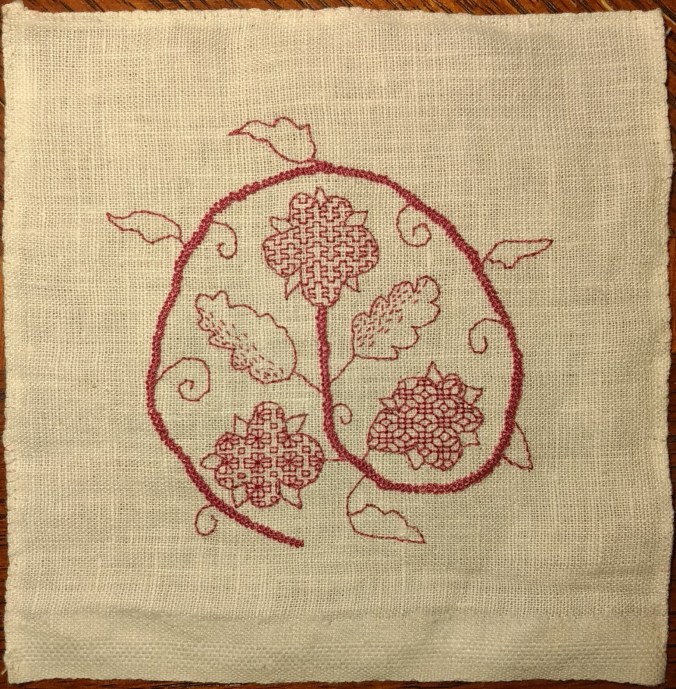
We’re back for more ways I did terrible things to my madder dye pots in preparation for March’s canvas work. None of these are the end of the world, clearly.. spoilers.. I got dyed fibre in the end. That being said, I absolutely did not follow best practices.. kinda. More on that shortly.

First off, more about mordants. (I love talking about mordants, I mean.. I teach an entire class just about mordants, not a dye molecule in sight, just getting things ready.) Anyhow, it’s an important step. It’s laying the foundation for everything and a lot of people, especially newbie dyers (and those of us who tend towards the impatient <cough>) spend a lot of time asking ‘Do I need a mordant? Really?’ Assume yes. If you aren’t sure, mordant. The dyes that are substantive and effectively self mordant won’t mind, and it’s good practice. It should be the default, not the exception. If you tend to use a lot of a certain kind of thread, mordant more than you need. Then, when you are impatient, or a friend says ‘hey, I’ve a dyepot going, wanna toss something in?’ (happens more than you think in certain circles), you have it ready and waiting. The mordant makes a chemical reaction with the fibre molecules, that’s the point of the process, it’s fine to get dried out and wait for your next dye day. (The dyes that don’t generally need a mordant are usually full up on tannins all built in, just in case you were wondering.)

By the same token.. experiment! Toss a mordanted skein of something and an unmordanted skein of something in the same dye pot. How do they differ? How do they differ in 6 months? We want this to be an exact science, but it’s not. The dye stuff, and the fibre itself are natural products and change year to year, growing season to growing season. There are trends, and generalities, but sometimes.. dye pots do whatever they darn well please, and we appreciate the colours they give us, even if it might not have been the one we were expecting. (Sometimes that appreciation takes a few days.. weeks.. to develop. <ahem>)

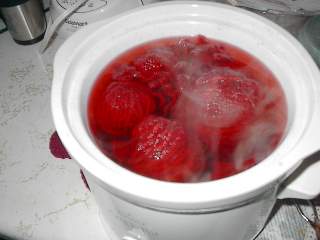
So when last we left our hapless skeins of yarn, they’d hung out in a mordant bath all day, while I went off and did things that get me a paycheque (I am fond of those paycheque things). I pulled them out of the mordant bath, and tossed them into a bucket to wait for me. I was planning on using them right away, so no need to carefully dry them out, and honestly, I was fine if some extra water and mordant hung out on the skeins (Sometimes mordant molecules don’t find their home with a fibre molecule.. it’s sad, but it happens. A missed match in the love lives of molecules.) While the skeins were hanging out cooling off in the big dye pot, the little crockpot was cooking away all day.

img_20200228_063536721

I am notorious for not gathering up my dyestuff into a little fabric baggie to keep it contained, and I did that this time as well. The last of an elderly (although at that point, I’d rather forgotten how elderly) package of madder (about 40 g) into a crockpot of water, put on low and away I went. A crockpot on low sits at about 200F, just a shade below the boil. (Thank you Edith for hunting that up for me). Madder shifts towards the browns at 160 – 180F. (Did I mention the lack of exact science? Right. Exhibit A.), and I was alright with getting browns. I rather like the red/brown that hot madder gives, and my dye crockpot doesn’t have a keep warm setting, and I wasn’t going to fuss with a sous vide water bath, or babysitting it to keep it warm, but not hot. Brown is lovely. Yay brown. It got to sit in the crockpot all day, and then I strained it through a scrap of cotton cloth into the dyepot when I got home. Like making stock for soup.. the liquid is the bit you want. Ask any dye worker (or cook) and you’ll find someone who has once.. just once.. absently drained some or all of what they wanted down the sink. <sigh> But not this time! Hold onto that strained stuff too, tie it up into a packet like I should have done to begin with. It goes back into the crockpot to get simmered again (hey.. could have more dye molecules left in there!), the dye liquor now is safely ensconced in the big dye pot.

This is, or should be, the strongest colour you’re going to get from your dyestuff. It’s the first extraction, it should snag the most dye molecules (even if they’ve been shifted brown cause lazy crockpot). Top it up with some water, toss in some mordanted fibre and hot it up. This time, I really did just get it to hot and then turned it off and left it to cool all on its own. You can just let it stay cool and ignore it for a really long time, but your dye molecules are making a chemical bond with your mordant molecules (who have already made a bond with the fibre). That reaction happens faster when things are hot.

img_20200228_063507711

There’s a few important notes in here. Your dye pot needs to be big enough to let everything float around with space in there, otherwise you will get splotchy spots. This is a grand dance of dye molecules surfing the room looking for a best beloved with a mordant molecule and relationships rarely bloom when you are nose to jowl with a pack. Wool likes consistency, if it’s going into hot water, it should already be warm at least. If it’s going into cold water, it should be cold. Wool doesn’t like getting roughed up, especially when its wet. Gentle swishing. Silk doesn’t mind the temp changes, and it’s moderately robust against swooshing, but it doesn’t like getting too hot, it wants to stay under that 180F as well (80C). Fibre should already be well soaked, or else the dye will strike differently on dry fibre vs wet fibre. The mark of a good dyer in history was not the funky dye effects that are popular in hobby dye now, but having a perfectly even product.

I generally leave it in the dyepot for a few hours, because otherwise I yank it out immediately which is fine in some cases, not fine in others. This time, I left it overnight, letting the dyepot cool off on the stove naturally. Rinsing is up next. This is where wool is the most fraught. You want to make sure to wash the wool well, but the water temp needs to be pretty much exactly what it came out of, and you need to not agitate the wool too much. Gentle! Gentle, gentle, gentle. Either pull the wool out of the container you are running water into, or run the water on the side without the wool. Gentle swoosh, or just let it sit. Squeeze lightly, or not at all. The adage I’ve always worked under is that one rinses until one is willing to drink the rinse water. Then you know it’s clean enough. You want it to get all of its running over with now and not when it’s made up into a finished piece and it rains. Or you spill a cup of coffee on it and it needs a bath. This is the time to solve the dye running issue. If it never stops running dye, you need to keep rinsing, or brain storm a new way to convince the dye to bond with the fibre. (That’s a whole different post.) Tah dah! You have dyed your fibre, hang it up to dry (I used to use a drying rack in the tub, but my drying rack turned out to be the perfect size to hang sausage off, so now I have a much smaller rack that fits in the tub. I think it was supposed to be a shoe rack at the dollar store.)

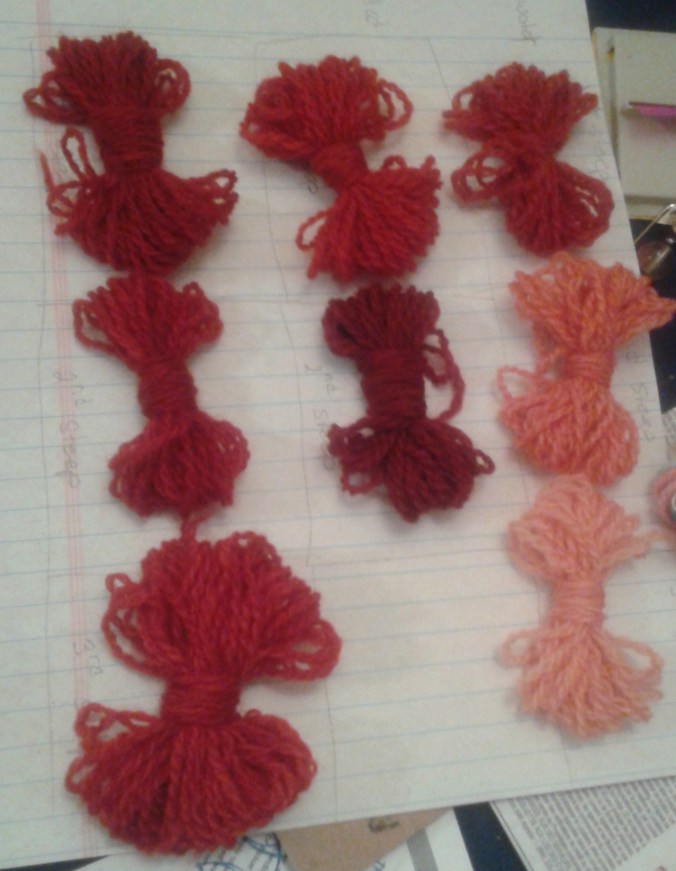
But wait, I can hear you say, there’s still colour in the dye pot, and the little bundle of madder dust has given a wee bit more colour.. yes there is! This is when you start tossing more skeins in and getting the paler colours, as there is less and less dye left in the vat. When you started with a darker red/brown, now it’s more peach, or pink, until you’re getting the most vague blush and then it’s time to toss the bath. At this point, you could pop them into an afterbath to modify the colour, which I did with one. Some iron sulfite into water (a more period route is to let metal hang out in tub of water ’til it’s good and rusty, or simmer it in an iron pot for a while, I went the modern route), let the dyed skein hang out there to have iron molecules mess with things a bit. Iron makes colours ‘sad’, sort of dulls them out, which is a nice shift when you’re looking for shades.

img_20200301_142242391

I got pale (for madder) colours, even on my strongest bath, because my madder is elderly. Like ‘could start school’ sort of elderly. I combated that somewhat by simmering the snot out of the poor stuff, but it shifted colours, even from when I used it for my pent a few years ago (yes, same batch of madder, and it wasn’t new then!). There’s a good reason why madder is one of the most common and popular dyestuffs, it is versatile and even when you are a complete jerk to it, you still get pretty colours that are fast. They don’t budge much.

I harp a lot about not using random stuff to dye with, because for my time at a dye pot, I want something that is going to give me good colour and be pretty solidly light and wash fast. In my early dye days, I didn’t care.. I tossed anything and everything in to see what happened? You get a lot of terrible yellows that fade quickly, but that time built skills and taught me a lot of things, even while I got fugly yarn. If you’re starting out.. experiment! Make ugly yarn, you can always overdye it, but know that for those working in a professional environment as a dyer, they used the tried and true that was worth their time doing.

Madder abuse (pt 1)

So.. plot twist! Instead of calmly gathering threads out of stash, I’m digging out the dye pot. Get comfy, this is a longwinded chatter about my dye process, as I’ve had a lot of questions recently.

Y’know, when I started this hare brained scheme of doing a sample of embroidery per month, I figured it would be a quickie couple week tiny project, badaboom, badabing, and done, move on. Instead? A full month for each so far, generally involving doing dye work, or elaborate tiny stitches and a whole lot of trying to ruin my eyesight. Clearly the answer for March was to dye a spectrum of shades in natural dye on elderly wool. (I swear, one of these months, I am going to pull everything out of stash, and I won’t have dyed or spun or woven any of it and I will feel /so guilty/ for the whole month. I am ridiculous. When this happens, please remind me that I am being silly, and I do not have to mine my own gold.)

IM001642.JPG

This is probably Kool Aid.

Anyhow! Back to the dyepots. I should mention a couple of points here. I have been doing dyework for a really long time, and I am the absolute WORST for throwing things at the pot, accepting and acknowledging that I am going to get whatever, and not being too stressed about that. It makes me a moderately terrible resource when people ask me for a precise recipe to follow because my notes read like most historical recipes. ‘Season to taste, cook until done’. I can’t always articulate the why of doing something at the time, but I know that it’ll get me what I have vaguely imagined in my head. (And then I talk to a dear friend who does not work in a spaghetti at the wall sort of fashion, and she points out in an organized analytical fashion why everything I did got me what I got and I go ‘oh yeah, that makes sense’) I also work in tiny quantities. I dye skeins of embroidery thread. Even my skeins of knitting or weaving yarn are quite small, because a couple thousand yards of threads lasts me approximately forever at the scale I work at. I am not certain I have ever dyed finished fabric. I know the theory, but I don’t work at that scale. Heck, I dye primarily in a small crockpot. (Which is never, EVER used for food. If you looked at the inside of this, you would know why you NEVER EVER dye in food pots. EVER.) (exceptions made for kool aid and icing dye, but I don’t use that all that much anymore, although it is /so much fun/.)

2016-03-09 22.37.35

Madder experiments in 2016

I have dyed extensively with madder before. It is one of my favourite dyestuffs, and its often the one I turn to first. I love the colours, I love that it is really quite fast, I love that it is not a terribly expensive dye, I love that even when I do all the stupid to it, I still love the colours. It is, however, a fussy dye. It is not indigo / woad levels of high maintenance, but there are a LOT of variables that will change the colour of madder. It’s sensitive to temperature, pH and water composition, and can vary from deep brick red-brown to eye searing orange, depending on what you do to it. It also had the advantage of being in my dye stuff stash, which is getting well picked through and elderly at this point. (More on that later, but I really do need to do a good solid stock up soon.) I was on a timeline, and it was handy. Done and done.

img_20200227_065534547

Skeining off silk.

First up is getting the yarn skeined off. Tossing a ball of yarn into a dyepot is a fast train to the outside being a great colour and the inside being undyed. I have totally done this on purpose at various points to get a neat gradiation effect, but it’s not the medieval aesthetic, so I rarely aspire to it these days. So! Skein it out, and then I use about 8 figure 8 ties to keep everyone together. That means, at 8 spots in that skein, I have split the skein in half, and popped a little tie around both halves, VERY LOOSELY. You want to be able to have a couple fingers worth of space in that tie, and you will make the weavers whimper. (Weavers, when tieing off yarn, want it to not go ANYWHERE. Dyers, when tieing off skeins, want it gently herded to not get too far. The transition between the two mindsets takes a moment.) Some folks live on the edge and only do 4 ties, but I’m a weaver too, and I can’t quite be that zen, so I err on the side of paranoia and keep it a little more constrained. You want the ties to be loose such that the fibre can move freely around in the water, tie them tightly and you get 8 (or however many ties) regularly spaced undyed sections. (A feature for some! I’ve also done it on purpose, to great effect.)

2017-10-05 07.22.22

Onwards to mordanting! (As with most things in the A&S world, there is a lot of prep before you get to the thing. You can either rail against it, or just embrace it as part of the process. I am not always very good at that second bit, I’m a work in progress.) Mordanting is a pre-step in natural dye work, to basically lay a chemical foundation for the dye reaction. Not all dyes require it, but most do. I teach a whole class in the chemical processes involved in mordanting, but the crux of it is that most fibres need a little chemical bridge between fibre and dye molecule. The most common of these is alum. (Yes, the same stuff you use in pickles.. okay that reference might not be helpful to most.) Dye work is done by weight. This is the reality of life, and the sooner one picks up a scale the happier it is. Weigh the dry fibre. (dry is important here), for alum, we generally want about 10% of that weight in alum. (This starts to become personal dye attitudes. Some folks aim for 5 – 8%, some add 1 or 2% of cream of tartar into the mix. I am boring, and mordant with straight up alum at 10%. Done.) The amount of water.. fairly irrelevant beyond ‘enough to ensure the yarn isn’t crowded’. We are specifically aiming to put enough aluminum compound molecules in there to react with the locations on the fibre. (dye molecules.. much the same.. the amount of water is irrelevant, beyond ‘enough’). As a friend once put it: it’s like marbles in a bathtub, adding more water doesn’t make more marbles appear. The yarn should be wet going into the mordant bath, and wool takes forever to get properly wet. It has a hydrophobic (hydro: water phobic: dislike) layer on fibre, and it needs some time to get past that. Best practices say soak it for an hour or so. I don’t always, sometimes I soak it for much longer. Toss the wet yarn in, and get the whole thing hot. The reaction WILL happen at room temperature, eventually, but most chemical reactions are much more zippy when they are warm, so hot it all up! I had silk in the mordant bath as well (if I’m getting the stuff out, I might as well dye more than I need, future me will thank me), and silk doesn’t like to boil. It starts to lose its sheen above about 80C. So I got to ‘thinking about simmering’, and then shut it off and went to work.

Okay, that’s more than enough rambling about dye work for one day.. part two coming soon!


March is for Canvas work!

Somehow, we have ended up in March already! Yikes! I did manage to finish up blackwork with a few days to spare, and then promptly used those days to madly start on March’s work. Blackwork reveal next week! Tromping through the alphabet, we’re on to Canvas Work!

Canvas work includes embroidery such as needlepoint and bargello where the canvas is completely covered by the design. This is often rugs, cushions, or wall hangings. Sturdy things, usually done in wool. I spent some time asking other embroiderers for their favourite canvas works from period, and there was plenty of pretty needlepointed cushions and the like, but one friend is on a crusade about SCA period bargello. 

parkham house flame stitch

Parham House, West Room

Bargello is that zig zag flame pattern that we all know and love from bad 1970s textiles when it had a glorious revival. It’s also known as florentine work, or hungarian point, or flame stitch. It becomes quite popular in the 17th century but there is a single example with a firm date pre-1600. It’s located in the West Room of Parham House in Sussex, UK, an Elizabethan manor house built in 1577. The hangings are described as ‘16th century Italian wool wall hangings’. A whole lot of time with Google later, and I found a single close up shot: (in a gardening magazine of all places. Gardens Illustrated, November 2017)

parkham magazine

Tulip garden inspiration, apparently

With my inspiration piece decided upon, it’s time to look at how I actually want to go about doing this. I have a couple of potentially suitable canvases, and a wide selection of wool. I have both 18 count canvas (brown in the photo) and 22 count canvas (white in the photo), and experimented with various wools on each. 6” is not a lot of space to show much design, which makes every stitch count. Adding to the pros and cons of each is the choice of wool. The 18 count canvas takes tapestry wool well, which I already own in a variety of colours. The 22 count canvas takes a vintage knitting wool best, which I only have in white and would need to dye myself.

img_20200225_071113626

Test wool

The next task was to manage to get something at least inspired by the extant piece charted up to have an idea on what I was going to stitch, and hopefully use how well the pattern repeat sits in the different count of fabric to decide between the two. 

I printed out the garden magazine at about the right size to get approximately one repeat to sit in my 6” square. Because the photo is so dark, it was not the best print, but sharpie to the rescue to make it visible on the light box. I then could trace the general shape onto graph paper. That general shape got translated loosely into a charted version. Considering how the pattern translates, I expect that the original fabric was not even weave (i.e., not the same number of threads per inch in the warp and weft), which is interesting. Counting out how many stitches I’d have at 22 count vs 18 count, I’m happier with the slightly more stitches. Unfortunately, that means that my next task is dyeing yarn. Plot twist!